If you follow Jarrah Jungle on social media you will have seen us installing the courtyard fence slats over the last few weekends.
Lexi is so excited about her new play area being created she can't wipe the smile off her face!

We broke this project up in stages, first we hung the gate and next we installed the fence slats.
Instead of paying someone $2000 to install the fence slats, we spent $400 on a saw and did the job ourselves over 5 half days.
The other tools needed to install the fence slats we already had - a level, drill and drill bits, pen, pencil and measuring tape.
Lexi is so excited about her new play area being created she can't wipe the smile off her face!

Instead of paying someone $2000 to install the fence slats, we spent $400 on a saw and did the job ourselves over 5 half days.
The other tools needed to install the fence slats we already had - a level, drill and drill bits, pen, pencil and measuring tape.


This was a 2 person job so no baking muffins in the kitchen for me, I was outside working with Mr P being a tradies lady and it's a good feeling being able to say I helped to build this!
First of all we did one complete fence panel to work out how to install it and then once we knew what we were doing we installed the rest of the fence in stages - cut and fit all the inside channels and then cut and installed all the fence slats.
This way we weren't changing tools and drill bits all the time doing the side channels then the slats, then swapping again, so it was a much faster way to work.


This way we weren't changing tools and drill bits all the time doing the side channels then the slats, then swapping again, so it was a much faster way to work.


STEP 1 - INSTALLING THE INSIDE CHANNELS
The channels we cut to size, centered on the inside of the brick pillar, pre-drilled them, then making sure they were centered and straight, screwed them into the bricks.
Installing the channels was half a days work, a lot of time was spent checking the measurements and the level to ensure it was straight.


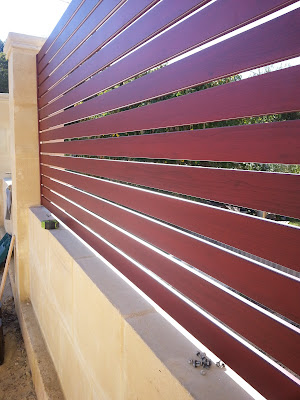
STEP 2 - INSTALLING THE SIDE FENCE SLATS
Once all the side channels were fitted we could install the fence slats. This is when the fence really started to take shape and look like a proper courtyard.
It was really great the way the slats were packaged with plastic between each slat, this kept them tightly wrapped so we could cut 5 lengths at once.
This saved us a heap of time as you can imagine, with each panel being a different length and height, some were 14 slats high and others 9 slats high, so there was a lot of measurements and cuts to be done!


For the gap between slats I wanted it to be quite close together and private, but the gap had to work in with the height of the pillar, the channel and the width of the slats as well. So we put on our thinking caps and got the calculator out to work out the best combination with the measurements.
We ended up with 14mm gap between each slat and the very first piece of wood we grabbed to use as a spacer was exactly that size, how lucky is that!
We ended up with 14mm gap between each slat and the very first piece of wood we grabbed to use as a spacer was exactly that size, how lucky is that!
So that was my job to hold up each slat with the spacer in between while Mr P screwed it in, working our way from the top down to the bottom.


Then we moved down one by one taking care to space and screw until we got to the bottom. The end caps helped give a really nice straight edge to the bottom slat so it looked neat and even.


STEP 3 - INSTALLING THE FRONT FENCE SLATS
The front fence panels were really long at 3.8 metres and had a bit of movement when hung between the pillars. They wobbled a bit too much for our liking so we made a middle post to secure the slats to so there was no more movement and to make it stronger.
This meant we had twice as many slats to cut, so instead of 14 slats each panel we had to cut 28.
We don't do things the easy way in the Jarrah Jungle but we make sure they are done right and will last a lifetime!


You can buy the middle posts for about $20 but the place we bought the AliTimber from was closed for the weekend so we decided to make our own post.
We made the post using a left over fence post from when we hung the gate and attached a channel to either side of it.
We even painted the screws so you couldn't see them, we found a small can of Colorbond Red Manor spray paint that matched the jarrah metal slats perfectly.
We made the post using a left over fence post from when we hung the gate and attached a channel to either side of it.
We even painted the screws so you couldn't see them, we found a small can of Colorbond Red Manor spray paint that matched the jarrah metal slats perfectly.
We made a bracket that we attached to the brick, then attached the post to the bracket. We spent ages making sure the post was perfectly straight before we could start installing the metal slats to either side of the post.


STEP 4 - INSTALLING THE CORNER FENCE SLATS
Now for the two corner panels, they were really tricky to install because they are on an angle the side channels can't sit flush against the bricks, so we had to make up brackets to secure the channels to the bricks.
First we had to make up the fence slat panel free standing, which was a lot harder than making the panel when it's secured to the bricks. Once it was perfectly straight and level, we attached 3 brackets to each side.
The brackets had to be bent in the vice (thanks to our lovely neighbor who let us use his shed and vice for this!) so they would sit around the frame and screw into the bricks.


The other corner at the front of the house is a perfect spot for our letterbox and house numbers ..... that's this weekend's project!
I'm really proud of what we've achieved out here and can't wait to landscape and furnish this area so we can sit out here and enjoy all our hard work!
Sharing with link parties:
Curly Crafty Mom - Motivational Monday
Savvy Southern Style - Wow Us Wednesdays
The Dedicated House - Before And After Wednesday
First we had to make up the fence slat panel free standing, which was a lot harder than making the panel when it's secured to the bricks. Once it was perfectly straight and level, we attached 3 brackets to each side.
The brackets had to be bent in the vice (thanks to our lovely neighbor who let us use his shed and vice for this!) so they would sit around the frame and screw into the bricks.


With the Colorbond Red Manor spray paint we also painted all the metal brackets and screws so they're the same colour as the jarrah metal slats and they blend right in you, can't really see them now so it worked a treat!
It was my job to paint the 12 brackets which took forever to do .... they were covered in a sticky barcode label which took hours of scrubbing and soaking in orange oil to get off, I then soaked them in vinegar and water to remove any residue and this also helps the paint stick to metal, I used a primer spray paint on both sides, and then the Colourbond spray paint on both sides .... this took hours!


I'm really proud of what we've achieved out here and can't wait to landscape and furnish this area so we can sit out here and enjoy all our hard work!
Sharing with link parties:
Curly Crafty Mom - Motivational Monday
Savvy Southern Style - Wow Us Wednesdays
The Dedicated House - Before And After Wednesday

For exclusive extras and daily updates ... follow Jarrah Jungle on Facebook, Instagram and Twitter
[All images my own]
Pin It Now!
Your husband is SO talented, is there anything he can't do? And, Lexi does look excited! lol! She must know :)
ReplyDeleteCarrie
curlycraftymom.com
Soon to be husband Carrie :) He is amazing he'll give anything a go and impresses me each and every time xx
DeleteLove that pic of Lexi. She really looks very happy!
ReplyDeleteLexi is loving the extra space, last night I put her out there to sniff around for a while she is loving all the different smells and sounds that are out the front of the house, much more interesting than the backyard :)
Delete