The vision of turning our Dining Room window into a doorway that leads out onto a deck was thought of on the very first day we moved in. Worn out from moving both Mr P and my stuff from 2 different houses into our first home together we were sitting back under the patio admiring out new house and one of my mates who helped us move said ...
It would be good if that window was a door to outside
then I said
Yes yes oh yes onto a deck ... I've always wanted a deck!
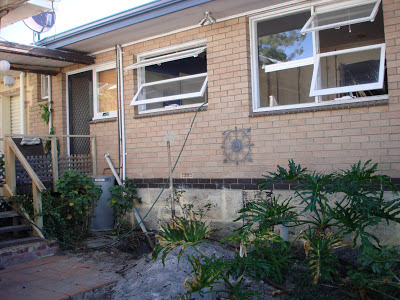 |
| The window on the right hand side is the one we want to turn into a door way |
We've had some
Dining Room dilemmas due to the size of our Dining Room being too small to entertain in so we decided to create an
outdoor dining area with a new outdoor setting and entertain outside. This has worked really well throughout the years we've had some great dinner parties outside. Because the Dining Room was then free of furniture
the aquarium and wine buffet was moved into the Dining Room and the space was otherwise left free so there was room to sit at the kitchen bench without feeling to crammed in.
 |
| Dining Area inside |
 |
| Aquarium and wine buffet moved into the Dining Area |
 |
| Dining area outside |
Fast track a few years on and in our kitchen renovation
we have allowed for the doorway to be built into
the design. Although it will take some space out of our already small dining area, we have the idea of having a slim line dining table and chairs like a bench seat and table up against the wall so we can entertain in here if there's just a few of us and we'll otherwise head outside to the larger area.
This allows us the best of both worlds - a small entertaining area inside and a larger entertaining outside.
You'll see below we have drawn on the wall where the kitchen bench will come up past the window. We've allowed enough room for a set of double doors to be installed in place of this window. Unfortunately, we changed our minds after the design was signed off on where we wanted the kitchen bench to come up to - where it is now it's going to protrude into the dining space too much which would mean the doors would be pushed into the corner rather than centred. As this part of the kitchen cabinets had already been made we had to pay $200 extra for the change, to reduce the size of the bench and the set of drawers on the end. Whilst I wasn't happy about losing storage space in the drawers we decided it was worth the sacrifice to get the right feel for the room and be happy with the end result.
 |
| Kitchen bench drawn on the wall to show where the bench will come up to |
 |
| Loosening the jarrah frame |
 |
| The old glass windows removed |
 |
| Removing the jarrah frame and taking out the metal lintels around the brick frame work |
 |
| Window removed ... there's no going back now! |
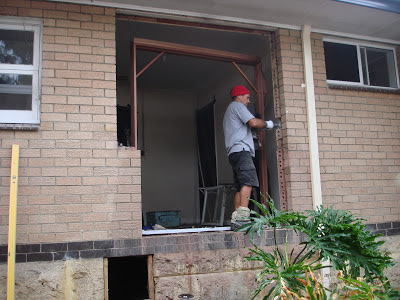
Once the window was removed the heavy duty wet saw was used to cut a doorway out of the double brick wall - this was a very dusty and noisy job. The height of the doorway didn't help either, as you can see there is quite a steep drop from the inside of the house to the backyard.
 |
| Out comes the heavy duty artillery - wet saw to cut through the double brick walls |
 |
| Making progress cutting out the doorway |
Once the doorway was cut out we were ready to install the timber frame and then brick it up and cement it into place.
 |
| The custom made double door frame |
 |
| Doorway cut out ready for door frame to go in |
 |
| Fitting the door frame and making sure it was perfectly level took a bit of time and patience |
 |
| Once it was in place the frame was bricked into place with bricks and cement |
 |
| Fitting a metal lintel across the top of the frame |
Once the frame was in we had to protect it by either painting or staining the wood. We decided to paint it to match the rest of our window and door frames which are painted white. The double doors we are going to keep the wood look and stain them to make them a feature.
 |
Painting on the undercoat and the next day they got a light sand and another coat of undercoat
and are now ready for a coat of white after the doors are installed
(they will probably get scuffed or marked which is why we're painting them after the doors go on) |
 |
| The door way will be boarded up for 2 weeks until we have the double doors fitted |
So these are the doors that we are installing, we scored them for $50 each they are seconds doors so have slight imperfections and they also need glass which we are getting quotes for and will have a go at fitting the glass ourselves. Once the doors are installed we will stain them to protect them from the weather.
 |
| Our 2 doors we scored for $50 each - they need glass inserts and staining |
So what about that deck? Yea ummmm that's the next project after the kitchen ... and probably after
the Courtyard too.
For now it will be a doorway out to the backyard with a steep drop so we'll probably keep the doors locked until we can come up with some sort of platform!
[All images my own]


Michelle, boy that was a major. Looks like you were lucky with the weather. Cheers
ReplyDeletewow wow wow, love that you guys are going hard nuts and doing it all........seriously gonna look amaze when its all finished....you go you smooch xx
ReplyDeleteCrazy nuts more like it :) thanks lovey
DeleteWow! So impressed that you did all that in a day! Did you get a professional guy in to cut through the brick or was that Mr P? We are toying up cutting out our 70s arches to square them off - but it seems like it will be a hell of a lot of mess!
ReplyDeleteIt was about 6 hours work for the 2 lads ... with a sandwich break of course :) Yes we had a brick layer help us he cut through the bricks and laid the bricks etc with Mr P helping. We borrowed the wet saw, it stops a lot of the dust using that but you would still need to tape up your house. It would be worth it though :)
DeleteThis is a great idea! You guys are just plugging away one job at a time. It will be no time and you will have the deck done!
ReplyDeleteLooks amazing already! You reckon the outdoor area will be ready for summer?
ReplyDeleteI would love to have it built by Xmas but will have to wait and see :)
Deleteit's going to be fantastic!...do it as soon as you can, you won't regret it. xo
ReplyDeleteWOW!!! These is so impressive, you're going all the way..atta guys! I remember we did a total more than 2 years ago with our kitchen and it was great after it, though. It's gonna turn out FABULOUS, can't wait to see it and hope you share. Thanks for your darling visit and yes, my best part is fixing the tables, lol..
ReplyDeleteFABBY