The bathroom renovation was a huge project - my organising skills were put to good use I made lists of who was doing what (us vs tradesman) and what our budget was keeping track of our expenses along the way (see cost breakdown at the end of this page). We are under the $10,000 mark which is pretty good considering the quality of products we put into this project.
We wanted a stylish modern bathroom in colours that would suit any taste but that could be changed up with different coloured accessories for a new look - we went with stone look grey floors, floor to ceiling white tiled walls and metallic feature mosaic.
We also wanted twin basins and a twin shower because I love sharing my shower with the man I love :) We also had a custom vanity made to give us as much storage as could possibly fit. We would have liked to fit a toilet in too but there just wasn't enough space and we didn't want it to feel crammed.
We also wanted twin basins and a twin shower because I love sharing my shower with the man I love :) We also had a custom vanity made to give us as much storage as could possibly fit. We would have liked to fit a toilet in too but there just wasn't enough space and we didn't want it to feel crammed.
This was our 1960s retro purple bathroom BEFORE in all its glory
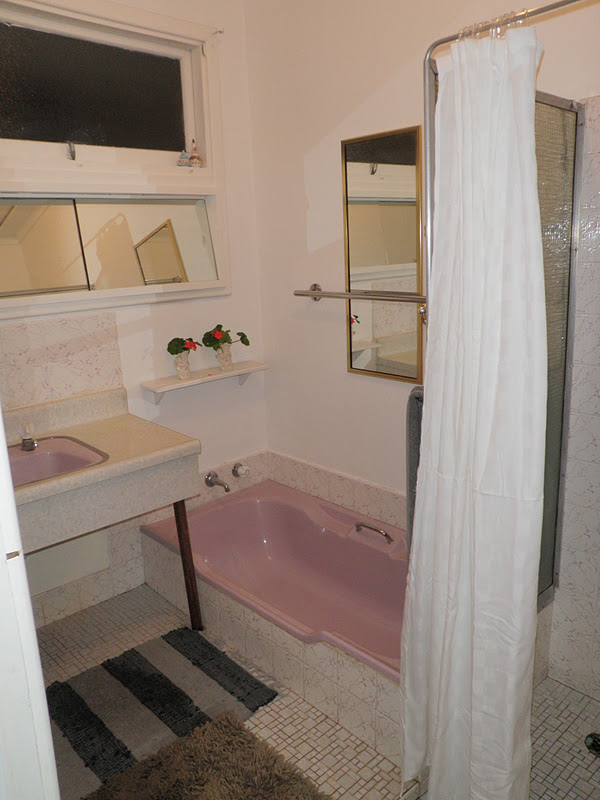
Let's start with the small purple sink being held up with jarrah legs and absolutely no storage - sadly the photo above is the only one I have of it. About 6 months after we moved in we replaced the original sink with this vanity that our family gave as because they didn't need it anymore - it fit perfectly and we put some new taps on as well and it got us through until we did the major renovation.

Hows about that tiny little purple bath (which we didn't use once!) that was removed and taken to my parents farm for a water trough for the horses ... you can see snippets of the purple bath when you come up the driveaway! We decided not to put a bath into the new bathroom design in lieu of a double shower - hopefully this doesn't turn off any familys with kids that need a bath. I guarantee the kids will love the double shower instead!

The old fashioned mirrored wall unit had shelves that were too short so you couldn't fit deodorant or any of the tall essentials in. Also the mirror was so high I had to stand on my tippy toes to see my face which was not fun at all! The new storage and mirror were going to be a lot more functional.

The frosted window was in a jarrah frame above the wall unit. In the new design the shower was going to go across these walls to wall so the window needed to be replaced with a water proof metal window frame. We spent a lot of time figuring out what kind of window to put in which you can read more about here.

The shower was a small square 900x900 opposite the bathroom door so the draft from the door would make the shower curtain stick to my butt so annoying! The new shower will be 1740x1000 with 2 shower heads so 2 people can shower together at the one time and both enjoy a long hot shower with ample room.

Planning the design took a bit of time - you really need to be clear on your design BEFORE you start ripping everything out. Once we had chosen the tiles, picked the twin glass basins, designed the vanity, and sorted out where the plumbing would go, bought the tap wear and shower grate etc THEN we got out the tools and started the demolition.
Mr P on the sledgehammer and me with a metal scraper and hammer removing all the tiles and fixtures. Once we got through the tiles and concrete we were standing on sand and rubble - in the house - this was a dusty sandy job not for the faint hearted!


Once everything was demoed the plumber spent the weekend laying all the new pipework for the new layout - the vanity and sink would be where the old shower was and the shower would be where the old vanity and bath was. We also put in the electrical wall boxes ready for the electrician.

Next we had to make a decision about the window in the shower problem and we decided to install an aluminium window. We removed the built in vanity and bricked it up. I begged Mr P for a shower box to go into this alcove where the built in vanity was removed from and he made me one out of concrete sheets and water proofed it - now if a hand made shower box isn't romance I don't know what is!


We had the window guys install the new window which came with a surprise view, unlike the old frosted one you can now see the green of the tree tops outside. It lets so much light and fresh air in, unlike the old window which was frosted and never opened as it had no fly screen.

Now we were ready for the tiling to be done - we got the professionals in for this to make sure they did a perfect job. We picked up our tiles and had them ready for the tiler - he spent 5 days on the job chipped back the walls, screeded the floor, concreted, then he was ready to lay the tiles. After the Tiler vs Cabinetmaker battle of opinions we ended up taking the Cabinetmakers advice and decided to install the vanity and tile around it.


The vanity was delivered in 3 pieces and we had to fit the vanity in place ourselves and drill the pipes into the cabinet so the plumbing was ready. The granite bench top was delivered a few days later so we asked them to install that for us. Once it was in and ready, we got in touch with the tiler for him to come back and start laying the tiles.


The tiler came back and finished the tiling job - he laid the floor tiles, wall tiles, mosaic feature tile on the wall above the vanity and in the shower box. We decided to use grey grout on the floor tiles and mosiac and white grout on the wall tiles. The tiler was so patient with me he went through where the joins and cuts would be to make sure I was happy with how it would look before he started cutting. Be a part of the design and layout because once it is laid it is too late to complain that you wanted the tiles laid a different way!


The mosaic stripe of metallic tile above the vanity and shower box looks amazing - I didn't want a thin stripe I wanted a thick impact stripe and it turned out just how I imagined it. The shower box had mosiac tiles laid inside as well and is a real feature in the shower (when the zillions of shampoo bottles aren't in front of it!)


Once the bathroom was tiled we finished the plumbing and fitted the tap wear - rain shower heads which get your whole body wet they are so damn good. We are lucky we can both be in the shower and the temperature and water pressure works perfectly. We got matching mixers in the shower and basins and hooked up the plumbing for the basins too. Drilling into that granite bench top was pretty scary ... I couldn't bare to watch!


The shower screens had to be installed before we could use the shower or water would go everywhere ... that was a bit of a wait because of the Christmas holidays so we were stuck with the makeshift bathroom in the Granny Flat for about 8 weeks all up.


The ceiling had a big hole where we removed the old fan, so we filled it with plaster board and plaster, sanded it back ready to be painted. The ceiling was painted with an undercoat and 2 top coats of white wet area paint. The new light/heater/fan was installed by the electricians when we had all the new lights put in and they also hooked up the power points so I now have power in the bathroom - what a treat!


The finishing touches took a while to finalise like finding the right mirror which instead of twin mirrors, we ended up with a large oval shape which compliments the round basins and tap wear perfectly.


The towel rail was another epic decision and after looking at the single towel rails we ended up going for this 9 bar rack which is heated. Sounds extravagant but it was pretty reasonably priced and it helps the towels dry when its not even plugged in because it sits away from the wall so they can air dry. I would recommend these to anyone who hates drying themselves with a soggy wet towel!

That my friends is my bathroom tour so far ... we still need to paint the door frame and install a new door and handles and then we'll be completely and utterly in bathroom bliss.
Check out more posts about the Bathroom here:
Cost Breakdown:
Tiles - Floor Grey, Ceramic Tiles Centre/Tiletec Malaga $237.50
Tiles - Wall White, Ceramic Tiles Centre/Tiletec Malaga $667
Grout $7.50
Tiles - Labor, laying, waterproofing etc $2400
Shower screen doors, Budget Glass Maddington $1100
Window, Budget Glass Maddington $600
Plumbing Labour - nil
Total Spent: $8865.60
[All images my own]
Pin It Now!
I'm so impressed that you did this all yourself!!! I don't think I have the skills to tackle construction like that.
ReplyDeleteThe bathroom renovations that you did for your house looks really nice. I like the grey tiles that you installed on the shelf that was dug into the shower wall. That was a nice touch to add a stylish element to your new shower.
ReplyDeletehttp://www.southernaddition.com.au/what-we-do
It looks like a job well done.
ReplyDeleteI can't believe you only paid $2400 for waterproofing, new concrete slab and tiling! That is a bargain! Our tiler's would charge at least $3000 for all of that!
Did you remove the cornices or tile up to them?
You made the right decision installing the vanity first. Also the custom made vanity and stone top, $1500 is extremely cheap. Can you please let me know which cabinet-maker you used?
I noticed you didn't tile the vanity kick-board, make sure you seal the bottom with silicon, not grout or water can get into the kick-board and cause swelling.
If anyone would like to see what a 4 week bathroom renovation timeline looks like here's a good guide.
http://dreambathrooms.com.au/bathroom-renovation-timeline/
OMG!Your old bathroom is so similar to ours and we are also thinking of removing the bath tub and have a double shower instead!!! Your new bathroom is 99% what are after. Thanks for sharing!
ReplyDeleteDo it! We do not regret it at all removing the bath and absolutely love the space a double shower provides, it has added a real wow factor to our bathroom as well :)
DeleteGood Renovation! Thanks for sharing.
ReplyDeleteTFO
Really nice Renovation thanks for sharing the information
ReplyDeleteHi Michelle,
ReplyDeleteThanks for sharing your remodeled bathroom pictures!!
I really like the installed towel rail, can you please tell me where can I get the same?
You have covered almost all aspects of your bathroom remodeling, your post act like a guide for me. I was thinking to remodel my old bathroom and willing to hire a professional bathroom remodeling contractor for my project.. hope it helps!!
Regards
Ruben
Hi Rugen, thanks for stopping by and glad it helped you on your reno journey! The towel rail is from Bathware Direct in East Perth http://www.bathwaredirect.net.au/
DeleteHello! I have that exact same bathroom down to the tiles and bath - except the vanity was "upgraded" at some point! I would really like to know how you got the bath out. I have removed (brick) surrounds, but it is very firmly attached to the drain. Did you get a plumber to do it? Is there a tool that helps? I'm at my wits end and YouTube - my usual go to for Reno advice is of little help.. That bath HAS to go!!!
ReplyDeleteHi, yes it was a big job getting the bath out. We did all the demo and had a plumber disconnect the pipes so we could remove the bath completely. Good luck!
DeleteMr P tells me once the tiles and bricks are removed its the waste pipe holding the bath in. Dig out to expose the pipe and you'll need to cut it with a hacksaw or if you can get your hands on a demosaw that'll be easier.
DeleteThanks so much, I didn't expect such a timely reply- I understand you have a new baby (congrats) and I'm sure you're very busy!
ReplyDeleteI thought I might have to resort to a plumber- It annoys me that it will beat me! I will have to demo around it and get the plumber to remove the bath and lay new plumbing at the same time. My next question. Under the bath there is sand and around the rest of the bathroom is about 10cm of concrete, I assume that under that concrete is the same sand & rubble you found! Did you put in a sub-floor or lay more concrete? How much of that did you do yourself? Tell me to shut up anytime you like :)
Traditionally all these bathrooms are laid on sand and then they screed with a cement screed. Once everything is removed we smashed up the concrete screed. Then the plumber came and put in drainage and water service. We left the broken floor evenly spread ready for our tiler to come and lay a new screed on top. Hope that helps!
Delete